I have kept a few screenshot for when I was doing the project and to show the different stages that my final clips went through.
Here i have used a silhouette of the City of Paris and used Classic tween to pan across the city. I then exported it and named it as my first scene
I then hand drew a destroy city of Paris which show an animation of a monster chasing a man. and this man starts doing parkour,
I then moved on to rotoscoping the clip, which i have edited using after effects different plugins and played around with the brightness and contrast and came up with a hand drawn effect.
Using premier pro i compile all the videos, sound effects and soundtrack, I made sure that i rendered it out using the pixel size 1280x720 alongside exporting it as a .mp4 file. During the rendering process I have learnt experience in timing the sounds and using volume gains and reduction to create further effects.
Critical Review and Evaluation
After finishing my final 2D animation I have gathered some feedbacks from different people and they have mentioned that the rotoscope footage seemed irrelevant as I didnt show enough relation within the second scene where the monster is chasing the man, In order to fix this I can show the monster literally chasing the man. However they liked the use of sound to portray that the monster is actually chasing the man. It is also mentioned that drawing and rotoscoping each frames was worth it as it captured the movement of the protagonist.
Another downside to my final animation is that it tends to switch to different styles, I have never really captured one style, and in order for me to do this, I will have to limit the colour palette and the different types of brushstrokes I use. The audience didn't really like the fact that the clip just straight away turns black with the sounds on, they've mentioned that it would have been better if i faded the last scene to black. However in my defence i straight away went to black as violence was about to occur which was the monster finally catching the man and eats him.
All in all during this project I have learnt a lot about myself and the different types of way i can approach certain aspects of my animation. Also i have learnt that maintaining one style is very important when it comes to audience relating to my work.
Grungy style for town with monster shows anarchy after the clean town just before - Footage seems irrelivent without something to link them I.e. assassins seeing the monsters off the roof - Drawn assassin looks like a lot kf time went into it -and #&#% me, it pays off !
In order for me to come up with ideas for the theme ''The Chase'' I had to look into existing movies/clips relating to anything that leads back to the word ''chase''. First of all I wanted to find out whether I want to approach an idea with the literal meaning of the word or an idea that symbolizes the meaning of the word.
Here are some of the ideas I came up with:
- Cops and robber (animals chasing each other)
- Chasing love
- Cars chasing each other
- Racing against time
- Monster chasing a protagonists
In order to narrow down my list, I then had a look at some videos and here they are:
although not a 2D animation this links to the idea relating to chasing love, however instead of the person chasing for their other half it is a supernatural (cupid) being that does it for him, and does his best to correct his mistakes and chases the long lost partner for the clueless man.
This video does not actually show a very active chase however the sense of trying to catch someone is captured in this 2D animation. This piece is very musically driven which means the animation follow the lyrical meaning of the song. Which reminded me to look at soundtracks that will be incorporated into my final piece.
The video produced is a stop motion animation by another college student which took the non literal meaning of chasing time, and turning it literal with the power of stop motion she literally took the clock and embedded it to the video as if it was another challenger for a race. Although I am not doing a stop motion i looked at this video just to gather some sort of script within my own.
Finalising Idea
Before moving on to producing a story board, I have finally decided that I will follow a literal approach to the theme '' The chase''. For my idea I will be making an animation of a guy getting chased by a monster and ends up being eaten. This monster will go through a City,
For the actual animation I will be doing rotoscoping due to the fact that I found a video reference which shows a man parkouring on top of a roof. I will also be doing frame by frame animation for the intro. all of this will be produced and compiled using softwares such as Adobe Flash Cs6 and Adobe Premiere Pro CS6.
Here is the video reference that I will be using for my final piece and for my rotoscoping. This video will be edited so that I can easily rotoscope it, this can vary from changing contrast to brightness and maybe some colour correction.
In addition, I have found my soundtrack for my final piece and this will be compiled with different sound effects that is suitable for my final piece.
Storyboarding
Before producing the actual animation, I needed to produce a story board which simplifies the story line in which I can present to the class. Also the story board will remind me of my main idea, although I believe that throughout production there will be some changes within the story board,
Here i have used arrows to display the different camera shots that I will be using in some scenes.
These story board is just a rough reminder of what my ideas going to be.
Production Schedule
I have produced a basic production schedule in order to keep track of how much work I have got to do and to stay on task.
During the production I have encountered some problems which I tried to simplify. One of these problems is that my rig was not working properly. So in order for me to fix this I had to redo my rig and by following this tutorial I was able to animate my model. During the production I will be using different types of software such as Maya 2015, Adobe Premier Pro CS6 and Adobe After Effects.
Due to the bad rigging animating the model was pretty difficult as I had to find a way to create movement without over exaggerating poses.
After animating, I then produced a polygon which I coloured green to act like a green screen once rendered,
After rendering, I then imported all the image sequences into After Effects and the live action that i have shot and used chroma keying to get rid of the green screen. After doing so I positioned the model to where its suppose to stand.
I then added shadows and some colour correction unto the scenes using after effects, plug-in '' Color finesse'' there wasn't much i could really do as the lighting of the live footage was pretty dark.
After all the necessary stuff I then used Adobe Premier to add sound and compel everything together.
Evaluation
During this component, I have learnt quite a few new techniques such as masking addings shadows, colour alteration, and using chroma keying. However I believe that with a lot more experimental work and practise I can produce a better composition piece.
During the animating side of things I have struggled a lot due to the fact that there were limited movements that my rig can do, which really unable me to position the model the way I wanted it to be. This caused the animation to be jittery and jumpy. Also the timing was off due to the fact that i did not use any reference, in order to better this I will record myself and use it as a reference. Furthermore I was not able to render the animation from maya due to the lack of time, this could have been fixed if a production schedule was produced. I could have also used more camera angles and shots to create atmosphere in the piece. The lighting could also be improved in the live action as well as the model as it seems like the model is out of place. In order to fix this will have to watch a lot more tutorials and learn the theories behind lighting. However, I believe that I did well in reproducing shadows for the character to help it fit in the scene.
In order for me to come up with different types of ideas for this component, I have decided to look at various types of videos relating to compositing a 3D model into a live action film.
Here are a couple that I have looked at:
This piece of short live action composition captured my eye due to the fact that I am also using a robot model to incorporate into my live action film, This piece of short film have influenced me to do something similar, A robot that is unwanted and I want to be able to portray neglection,
This piece of test animation, shows a stationary 3D model, moving. what interested me in this video is the dark lighting, I wanted to find out how this type of lighting can affect the tone and shadows of the 3D model and how well it blended in with its environment.
This clip caught my attention as the 3D model blended in with the live action really nicely, I looked at how the shadows are placed and how the lighting of the environment affects the 3D model.
Story Boarding
Before animating my 3D model ready for compositing. I had to finalize my idea, and had to produce a story board. My first idea was to have left behind in a park, more specifically behind a bin, this toy comes alive and is confused. The toy is then found by a little girl who picks it up and carries it home.
My second idea and my main idea is a toy that comes alive who is neglected by its owner, and is confused and seeks for attention, however the toy is still ignored.
Here are my story boards:
Here is my first idea, which portrays a lost toy in a park and ends up finding a new owner.
This is the main idea that i have taken on board, which shows a neglected toy seeking for its owners attention.
During the pre-digital era, visual effects we're slowly getting developed with new techniques being invented by film producers and directors. As computers and software's were not as advanced during this time, they had to come up with practical solutions in order to achieve some sort of visual effect. Most editing occurred in-camera, such effects created are substitution shots, reduction and enlargement of the aperture, frame split and double exposure. Some of these effects were discovered accidentally by film makers, one of these is the double exposure, in which film maker Geoges Melies, tried to fix the camera after getting jammed. Double exposure was then turned into and was considered as an art form(Reference). Another technique, that Melies used, was shooting through a glass, in which he would place a fish tank in front of the camera to get interesting effects. Melies techniques are still being used till this day including double exposure and the 'stop-trick technique in which enables objects to disappear and appear. (reference)
Visual examples of in-camera techniques
Double exposure, Georges Melies, L'Homme a la Tête en Caoutchouc (1901)
Stop Trick, Georges Méliès, Le Magicien,The Magician (1898)
Through glass effect, Georges Melies, Trip to the Moon (1902) - this effect is seen near the ending of this short film, in which he shot through a fish tank.
A modern version of split frame, James Anderson, Splitscreen: A Love Story (2011) - Although this is a modern version of a split frame, during the pre-digital era, split frame was produced via drawing a matte over a pre-filmed film plane, then wounding back the camera to shoot over the matte, allowing the second element to be embedded onto the area that has no matte. Pre-digital Projection Shots
Glass shot -This is a method of painting areas of the scene such as the foreground,background or both, into the glass surface and then shot through a camera. This allowed film makers to create the illusion of an environment instead of visiting or building making it more cost effective, Although there are disadvantages of using this technique as it can only be shot from one angle, as the camera is constrained, and if the camera moves the sense of scale of the scene will also change.
Foreground Miniature - it is a method in which film makers decide to create and design a small model which are aligned in front of the full-scale film set to the live action . It has a similar idea to the matte painting however, with this technique, film makers are able to control light and shadows to the miniature allowing the whole scene to be a lot more realistic.
Miniature Rear Projection - This method has not much of a difference from a rear-projection as it only replaces the live action into a stop motion animation and miniatures.
Rear Projection Matte Painting - a matte painting on a glass embedded with live-action being projected from behind the glass. The camera located at the front of the glass films and composite the painting and rear-projection.
Compositing and VFX Study of Metropolis
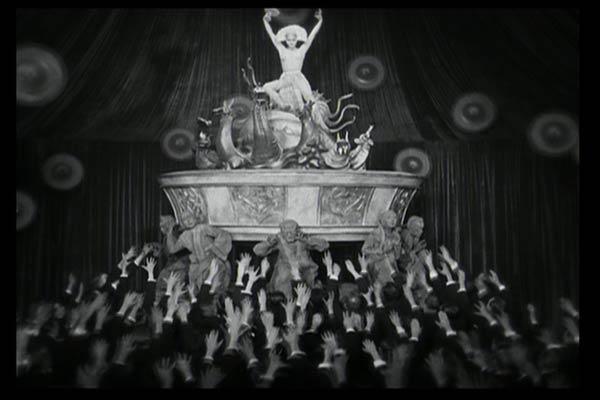
Metropolis, was written by Fritz Lang and his wife Thea von Harbou, which included a combination of different productions such as live action, models, artwork and camera visual effects. The film contains the idea of Lang taking us to the year 2000, in which he showcases through using his futuristic vision of the future, by building a gigantic city; inspired by his visit to New York, during the 1920's. It has been confirmed that it was the most expensive production the Germany's history, which costed over 5 million marks(Reference). Metropolis was also one of the first few sci-fi films that was produced during that era that incorporated various type of production techniques, and one of the few that used innovative techniques/ideas in order to create the 'futuristic' effect. One of these innovative ideas was putting a woman in a robot suit which allowed it to also move, which during those days, was completely out of context, as not many people really heard or seen much about machines, specially women turning into machines (reference).
Here you can see the scene which shows Maria (robot) moving, although not smoothly like a human, as this was due to the production of the robot suit, which gave the actor movement constraints. With the presence of a moving machine, it automatically puts the film at high during its time. Robots, were not the only thing that made Metropolis unique during its time, it was also the gigantic proportions of its set, which was built by using wood and cardboards which was painted on by artists. The cars that are seen moving on the extreme long shot are all done by stop-motion (reference) in which workers would moved it frame by frame according to what Fritz Lang wanted. Due to the shot and the scale of the set used, it gave the viewers the illusion that the cars were real life size cars.
Workers busy building the set ready for a shoot, and workers seen how they would move the cars one by one using a stick.
Here you can see workers behind the scene working on the set; you can compare the scale to the workers. the background is painted by artists. Special Effects The ideas and set were not the only innovative things that were produced during the production of the film, the film also included a very innovative special effects expert, Eugen Schufftan, who lead the visual effects area of the film. One of the innovative technique that he has invented that was used in the film, was called the Schufftan process, where he uses a mirror in order to produce an illusion that the actors on a different set is present on a miniature set. Schufftan did this by placing a mirror at a 45 degree angle to the miniature set and camera. The other part of the mirror is for the camera to shoot to the main shot of the actor and the background. (reference)
The process was also in order to produce the sense of immense size with not having to create a much bigger set than what the production has already built. The ''workers city'' which is the lower parts of the buildings were built whilst the higher area are mirrored using models.
The Schufftan process can be seen at the end of the clip which shows a race.
Another process that was used alongside the Schufftan process was the miniatures of the city, in which the camera would would shoot a miniature version of the city at a closer range to give a convincing sense of scale to the viewers, this was effective during that as it was more cost effective than building more sections of the set. Although has few disadvantages, such as the camera being constraint to one position as if it moves the liveaction will also have to move, which was not efficient.
This is a sequence of different shots to showcase the gigantic city, in which different effects were used in order to produce it.
This scene can be seen in the video with people marching across following Maria, in order to give a sense of scale Schuftan scratched away part of the mirror in which is placed at a 45 degree angle towards the set whilst the through the whole u can see people at a distance marching, this was more cost efficient than building a full scale set to allow people to march across the bridge.
The television telephone scene was way ahead of its time which shows a projection of one of the character through some sort of machine. Showing and seeing are merged into one into this scene, this was achieved by filming the opposite character backward unto then unto the tv screen using a projector before filming it using a camera that would be positioned in front of the TV, so it was live, the projector and camera were phase connected to make sure that both showing and seeing are synchronized.
The tower of Babel scene Eric Kettelhut , who was the artist of the tower of Babel that he achieved this scene using stop motion. The stop motion was produced with a great length of time and patience as Kettelhut drew two pictures of 60x40cm on a cardboard, with the stylistic idea in mind of a minute minimalistic photography, in which he said that he had a ranged of shadows from black to mid grey. He only used lighter shade to the windows that were constantly illuminated. In order for him to depict a movement of light he will have to erase shades and then shade again after a shoot.
Here you can see the actual drawing by Eric Kettelhut in which he would erase shades to create a beam of lights moving, this was also done with the Upper City Mountain day break scene.
Rotwang's house memorial to Hel scene
This scene used a miniature model head 60cm to be precise in which they projected unto the full scale headless pedestal at an angle to make it seem like its connected to the pedestal, a reverse shot is then used of rotwang which was taken on top of the pedestal, as they wanted to shoot him at a high angle.
The crew shooting rotwang at a higher angle using the pedestal.
Furthermore, Schufftan process was also used in the transformation of the Moloch machine with the combination of sliding mirrors. The moloch head was placed opposite the machine in which they blended into the camera shot, during the sudden steaming of the machine. The steam itself helps the the sculpture blend into the scene as it was mirrored. Here you can see the difference between when the moloch sculpture was blended unto the machine. Multiple Exposure Multiple exposure was used in this scene, which was done in-camera, in which Fritz Lang had to rewound the camera multiple times in order to achieve this effect. The multiple exposure enabled different scenes using different angles and shots to overlap each other, creating feathered blurs on the edges of the different shots.
Critical study - Maria's Transformation
The main character, a woman; was purposely used by Fritz Lang as it was his intention to play with the audience during that times expectation, in which a great struggle which would be resolved by a saviour figure or messiah. "There can be no understanding between the hands and the brain unless the heart acts as mediator" is a quote from the ending of the film. Lang implicates, that society needs to work as a whole system, and that social unity is such a precious thing that it should be valued (Fritz Lang's Metropolis Cinematic Visions of Technology and Fear,p191) In order to bring unity Lang suggest the idea of a messiah/saviour, this is when he introduced Maria.
Maria poses like a messiah/saviour ''The brain and the hands''
With the woman being considered weaker than men during the time in which the film was produced, Maria did not bring society together but was manipulated by the society, shaped; in order to get what they want, therefore she was transformed into a robot. Lang uses Hel as the anti-christ as she was described as ''The whore of Babylon'' which was described in the book of revelation chapter 17 and 18. This then coincides with what happens in the film as Lang places Hal at the Pleasure district performing with jewelries and glamorous costumes.
Hal At Pleasure District
Moreover, the transformation of Maria starts of with a close-up view of the humanoid version of her in an incubator. Rotlang then uses few controls to turn on the transformation machine, in which stop motion is used to show few machines move, with extreme close ups being used to the different equipments. Lighting effects that Fritz Lang used were beyond its time as it was hand drawn unto a film one by one frame by frame, the disadvantages of this is that if they mess up, they will have to start over again from the beginning as a little bit of difference will break the sequence and will not run as smooth as shown by the clip.
Each streaks of of lines and curves are hand drawn straight unto the film one by one.
Finally nearing the ending of the scene, lang wanted to showcase to the audience that the transformation of Maria was complete, so in order for him to do this he used double exposure, in which he carefully blended Maria's face unto the robot.
The layering of the visual effect is visible even through black and white as it has a see through effect, you can also tell that the drawings were done before the double exposure as it is at the top layer of the film.
Modern Technology
With the technology advancing really fast, certain techniques discovered in the early era can now be achieved in the modern day being more time efficient and of a better quality. These means that if the ''Maria'' scene is reproduced again new techniques similar to the early era is used. I will be talking about these type of techniques that can be used incorporate Maria into the robot. Some of these techniques are incorporating animated 3D models, chroma keying, digital mattes, set extensions and special lighting effects.
Animated 3D Models
The Maria scene can be achieved in the modern era by using a 3D model for the set and for the robot itself. Textures can then be added unto the models, in order for it to blend in into the live action scene. Also lighting will have to be considered and the different types of shadows produced. It is then imported into a compositing software in order to composite both the model and the live action in which areas of the model and live action can be manipulated.
This is an example of 3D models and live action composited together, this is taken from the re-production of the film '' Sky Captain and the World of Tomorrow (2004)''
Chroma Keying
Chroma keying is key to re-producing the Maria scene, as this will be needed to composite the live action and the backgrounds such as 3D models and digital mattes. Green, Blue, yellow or white screen is used to cover the set which is used to mask out areas of the scene during the compositing as it will be replace with the 3D models and digital mattes.
Digital mattes
Digital mattes can be used in reproducing the maria scene by a producing a background which displays all of the doctors equipment. This is then composited alongside chroma keying to separate the live action background and replace it with a digital matte.
Set Extensions
I believe that set extension will not work as much as it would in the Maria scene as it is not a vast scene. However it can incorporated into the other scenes such as the Moloch scene and the city sequence, which displays a vast area that is needed to be covered digitally. Set extensions can be done via matte painting or 3D Models.
Although in these scenes, they have used models and mattes, with the modern era's digital techniques they can make these scene a lot more realistic and more time efficient and cost effective relative to the times currency strength. Also it will not take hundreds of people to produce.
Here is an example of how set extensions work specifically matte painting:
Special Effects
The Maria Scene was most probably the notable scene through out the film as special effects was widely used, and was way ahead of its era. If special effects of the modern world were used in order to recreate the scene, particles to the lightning going across maria and the robot during the transformation to give it a more realism effect also all sorts of lighting will have to be added in order to create an atmosphere due to the black and white it limited the production team to create and effective atmosphere by manipulating the lighting. In addition morphing can also be added using a compositing software to symbolize the transformation, this will be more efficient as you don't need to shoot two shots to use the double exposure effect it can all be done when editing the scenes.
Here is a scene from ''Industrial Light and Magic (1988'' which shows a morphing scene which can be applied when recreating the transformation of ''Maria''
Bibliography
French, L. (2010). The Making of Metropolis: Special Effects by Gunther Rittau. Available: http://cinefantastiqueonline.com/2010/05/the-making-of-metropolis-special-effects-by-gunthe-rittau/. Last accessed 14/01/2015.
Hodgson, M. (2010). METROPOLIS (1927) - the 2010 restoration. Available: http://blackholereviews.blogspot.co.uk/2010/09/metropolis-1927-2010-restoration.html. Last accessed 14/01/2015.
Leedom, S. (2007). METROPOLIS- A CASE STUDY FRITZ LANG'S METROPOLIS- WHY IT'S HISTORICALLY IMPORTANT FOR THE HISTORY OF VISUAL EFFECTS. Available: http://metropolisvixfx.blogspot.co.uk/2007/10/scene-breakdown-pt-1.html. Last accessed 14/01/2015.
Lucas, F. (2011). The Art of Photo Manipulation. Techniques and Examples. Available: http://www.ourtuts.com/the-art-of-photo-manipulation-techniques-and-examples/. Last accessed 14/01/2015.
McGilligan, P (1998). Fritz Lang: The Nature of the Beast. -: St. Martin's Press. -.
Melanie76Mo. (2008). Metropolis_special effects. [Online Video]. 02/11/08. Available from: https://www.youtube.com/watch?v=84BcdT8senc. [Accessed: 14 January 2015].
Minden, M Bachmann, H (2000). Fritz Lang's Metropolis: Cinematic Visions of Technology and Fear. Rochester, N.Y: Camden House. -.
Myman, F. (1996). The "Nature" of the Female Cyborg: Evidence of Will in the Mechanical Woman. Available: http://francesca.net/Metropolis.html. Last accessed 14/01/2015.
Salah Eldin, N. (2012). VISUAL EFFECTS CINEMATOGRAPHY THE CINEMATOGRAPHER'S FILMIC TECHNIQUE FROM TRADITIONAL TO DIGITAL ERA. Available: http://www.academia.edu/2100338/VISUAL_EFFECTS_CINEMATOGRAPHY_THE_CINEMATOGRAPHERS_FILMIC_TECHNIQUE_FROM_TRADITIONAL_TO_DIGITAL_ERA. Last accessed 14/01/2015.
Stephens, I. (2010). Messianic Themes in Metropolis. Available: http://film110.pbworks.com/w/page/12610262/Messianic%20Themes%20in%20Metropolis. Last accessed 14/01/2015.
tabletopmoviemaking. (2013). Water Glass And Special Effects With The Lens. [Online Video]. 01 January 2013. Available from: https://www.youtube.com/watch?v=84BcdT8senc. [Accessed: 14 January 2015].
Various. (2013). Miniature effect. Available: http://en.wikipedia.org/wiki/Miniature_effect. Last accessed 14/01/2015.
Walker, M. (2011). Notes on Metropolis. Available: http://www2.warwick.ac.uk/fac/arts/film/movie/contents/notes_on_metropolis.pdf. Last accessed 14/01/2015.
XAЯA. (2012). Schüfftan process. Available: http://relativeunknowns.blogspot.co.uk/2012/09/schufftan-process.html. Last accessed 14/01/2015.
Using the the critical review to finalize my idea, I looked back at the ideas generation page and instead of doing a dance I have decided to do some sort of mime, relating to kids due to the walk cycle that I have used, and using baby humour and at the same time adding adult stances in which adults can relate to humour.
I have simplified the composition to a much easier one, as this is what I can achieve with my ability with the amount of time I have left.
Production
For the production of this pantomime, I first needed the following programs:
- Adobe Premier CS6
- Maya 2015
- Adobe After Effects CS6
- Adobe Flash CS6
I first converted my video reference in an .flv file in which I imported into Adobe flash as a graphic, in order to see the key frames. This method should help me improve my walk cycle
After doing the walk cycle I looked at different child related movements and I found one which was the ''peak-a-boo!'' I have used this as the final movement in the pantomime, I then decided to record an audio piece that will have me say ''Peek-a-boo!''.
Moreover after animating the rig I then decided to add a polygon green screen behind it so that onced I rendered it I can add a loop of abstract video. After adding the green screen I then rendered the pantomime using just the perspective view. I rendered with the resolution 1280x720 pixels.
After rendering I imported every images into Adobe Premier and exported it as an .mp4 after doing so I edited it by using After effects, then once again imported it to premier to add the sounds and my voice note. After doing so I have rendered the final outcome.
Evaluation
Looking at the final outcome of my pantomime, I am satisfied on certain aspects of the animation, although there can be a lot of improvements that can be made. One of this is that I could have added more camera angles, in order to give the scene a bit more excitement. Also, I will need to work on walk cycles as at certain points the rig is somehow floating across the floor. In order to do this I will have to do a lot more animating in order to gain ''the eye''. furthermore I will need to learn how to block out keyframes effectively. But in order to do this I will need to find the key main points in the references. In addition, the timing was also a bit off therefore made the video a bit jagged.
As I have finally come to terms on what to do as my final piece, However,I wanted to find out from different audiences of possible changes that can be made when, finalising my final idea. But first here are my current existing ideas that where i have play blasted and edited.
Using this reference I have split the two scenes and reproduced it unto maya as an experiment to see how they will look and here are the small clips:
During a class discussion it was mentioned that the pantomimes story was not clear therefore, I needed to change it so that the on lookers are able to grasp the story. I showed the class the clips, due to the short duration they wanted to see what the possible outcome of each scenes were, as they wanted to criticise on how I animated. Although from the short clips they said that I will have to fix the walk cycle. and try get it as similar as the video reference, as I have mentioned that I wont be following the video references as much.
After gathering reviews from fellow classmates, I needed to change the ''story line'' of the pantomime so that it is much clearer, I have to finish the full lenght movement of the rigged character.
In order to try improve my walk cycle I watched a couple of video relating to walk cycles in rigged characters using Maya.


.jpg)